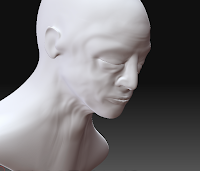
 adding detail to the sculpt using the brush's standed, clay tubes and slash 2 i start to create skin wrinkles where movment is apparent thinking about the muscle structure underneath. getting the main structure right first is key to the success of this detailing stage. next time i think more reference would be help full. i found i had the eyes too far out and the lips looked more like sausages where infarct they are angled into the face the muscle around slopes out each stage its best to make as real as possible before moving to the next division level. the small details like skin pours i mad my own brush using photoshop. making my own alpha brush could give me great control over the textures of the skin and other materials. it works by creating depth were the white pixles are and zbrush maps it onto the 3-d polygons extremely well. the skin pours were all created with this one alpha by rotating and varying the size and depth i was able to get a satisfactory variation. its amazing how much more realistic the face looks after adding the pours in.
The skin texture its self i find very interesting and will come back to Zbrush in part 3 to show the things i am studying and possibly go below the skin and try and create muscle and bone. At this stage i also started to play around with the shadows and lighting. to create a more real feel. genrally shadows outside are longer and inside shorter. the final render i want to have the face coming out of the dark so i also started adjusting the fog level.


No comments:
Post a Comment